
Tags

So. Stoning.
When I first heard about stoning your own figure skating dresses, I was completely at a loss. I’ve never been a crafty person, I can barely sew a button, and I don’t know the least thing about sequins or glitter or crystals. But it seemed like ALL figure skaters knew about this mysterious world of sparkle, and that it was understood that you would naturally stone your dresses to get it.
But I had no clue where to start. The internet is great, but all the references I found were written by people who… knew stuff. Who assumed you knew stuff. Who talked about hot fix vs. flat back, gross, Swarovski vs. Czech, 5mm vs. 20SS, and basically was way over my head from Step 1. I knew that I didn’t have $600 bucks to order a custom-stoned dress, but once I saw the difference that crystals can make, I wanted the bling. And I decided I would have it.
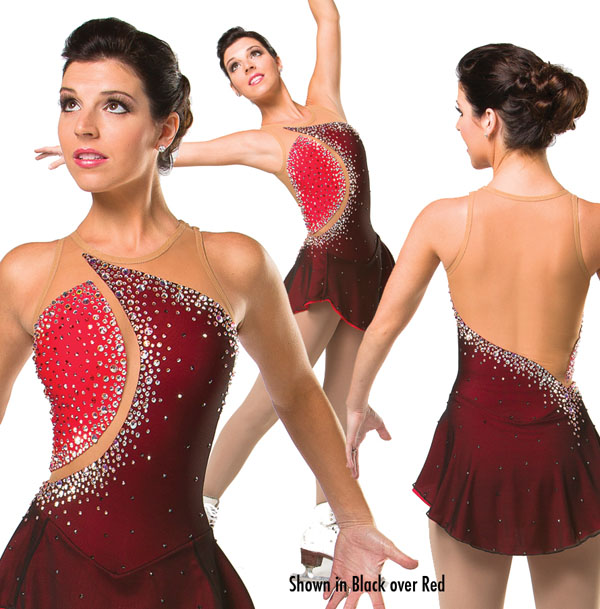
So I set about taking the dress pictured above and turning it into the one below:
I bought a new dress for the competition, which was a splurge because I already had a dress that I’d worn to the holiday show. It was a nice inexpensive dress ($35) and I could have worn that again, but I was both indulging myself and looking for a more satisfactory skating costume.
The first dress, once worn on ice, wasn’t quite as tight as I would have liked and a bit long (I got it from a dancewear site). I think skating dresses are most flattering at very short lengths, even though you feel self-conscious in them. Plus, I couldn’t wear a real bra under the dress, so I wanted something more supportive; the new skating dress is tight like a racing swimsuit, and holds me in comfortably.
After researching my options and experimenting with various glues and stones, I settled on my methods. It basically boiled down to glue and tweezers (and a lot of patience).
Tools used:
- Standard cheap rhinestones from the craft store. Flat backs, no stick-ons or peel-offs or heat required. I chose a few different sizes, which is a good thing because what I thought would work in the store looked a lot different on the dress. I used a LOT of them. Probably 600 of the size that I used the most (5mm), and maybe a couple hundred more in other sizes scattered throughout (3mm, 7mm, 9mm).
- Tweezers with slanted tips. You’ll get glue on them, so probably best to buy a set just for stoning.
- Glue. I used Gem-Tac fabric glue rather than the industrial-strength E6000 stuff because Gem-Tac seemed strong enough without the noxious fumes. It looks a bit like Elmer’s glue (and smells like it, ick), but it’s actually quite strong.
- Cardboard, cut into small squares. I started out squeezing glue onto each rhinestone back individually, then decided that was a huge waste of time. So I squeezed out big drops of glue onto cardboard, then dipped the rhinestones in the glue with the tweezers.
- Tissues. Lots of them. I got glue on the tweezers so I had to wipe them in between stones.
- Parchment (wax) paper. This is for the mesh part, which I explain below.
- A pin. The glue bottle tip dried pretty quickly so I had to poke holes in the tip regularly.
Armed with my tools and the photo above, I got to work. I started with a single row of stones along the border, because I needed to start somewhere:

(I looked into buying real crystals, because up close they really do look much nicer than the standard cheap kind you get at the hobby store. But once you put them on a dress they look fine, and until I have a compelling reason to go for high-quality crystals I decided I’d start out with regular cheap rhinestones. Which aren’t even terribly cheap, because they add up. I probably spent about $20 on rhinestones, whereas the equivalent amount in crystals would have run me two to three times that. In either case, it’s a lot less than paying an added $300 to the dressmaker.)
The nice thing about the glue is that it dries clear, so that even if you get sloppy, it doesn’t show up in the end result.
Which is handy, because I made mistakes:

Or rather, it may be more accurate to say that I wasn’t as careful as I could have been. But I didn’t want to stress out about this whole stoning thing, and seeing how the glue dried invisible really helped speed up the process. I’m patient, but not THAT patient.
After I finished with that trim, I thought it looked pretty nice. I could’ve left it at that, going for an understated look.

But no, I was committed to The Bling.
Looking at the photo, I realized belatedly that the pros had mixed up the sizes of the stones along their border, and mine was too even. Thus mine wouldn’t have that same nicely assorted look. Balls.
Oh well. I added larger sizes to the mix:

I thought that was really pretty, actually. I was tempted to leave it like that. But again, I decided on More Bling.
I scattered stones along the bodice before gluing them, trying to experiment with the size of the spacing. Too far apart? Too dense?

I decided on something in between the above two examples. Then I started gluing, one stone at a time. It was random, just sticking on stones at intervals and trying not to space them too exactly.
Not gonna lie, I ran into regrets. At about this point, I started second-guessing myself and worrying that I’d just wasted a brand-new skating dress and fearing that I’d done irreparable damage.
The only solution? Keep moving forward. More stones!

It was starting to look too busy. I had more regrets. I kept adding more stones. (I recalled hearing how the dresses that look classy and understated up close barely show up when on the ice.)
Once I’d beefed up all the borders with several rows of stones, I added more at intervals through the rest of the bodice and skirt. Again I just eyeballed it — if I tried measuring I would’ve driven myself crazy.

For the bodice, I just stuck on the stones normally with glue. However, the skirt has two layers, the red underskirt with the black mesh on top, and I only wanted the stones to be on the black layer. After reading up on it, I placed sheets of waxed parchment paper (for baking) between the mesh and the red fabric and glued the stones onto the top layer only. I got nervous that the paper would stick, but I peeled it off carefully while it was semi-dry, and it turned out fine.
And here’s the final product!


Sarah! Your blinged out dress is gorgeous! Holy moly! I totally need to hire you to add some sparkles to my next costume. I don’t want to spend another $400 to have the dressmaker add stones so I will have to do it myself too (or hire you – haha!). Bravo!
Isn’t it amazing how much difference the sparkles make? I admit when I first pulled the dress out of the package I was disappointed because it was so plain. But stoning was surprisingly not as hard as I feared! Time consuming, but not difficult (and I am NOT a crafter!).
Fabulous job! Your dress looks amazing.
I personally prefer real crystals because I think they have a lot more sparkle under lights, from a distance. I tend to use them lightly though (that would be a LOT of bling on your dress if they were real crystals.)
I recommend using Preciosa brand. I find them to be indistinguishable from Swarvoski when viewed from the stands/judges box, and they are cheaper since they aren’t the big name brand. Beadsfactory.com has some of the best prices I’ve seen- but you have to buy in bulk.
Absolutely fabulous though!
Great tips, thanks Jessi! I didn’t want to drop a ton of cash on top-of-the-line stuff for my first time and screw it up, but I can see how real crystals are worth it once you know what you’re doing. Maybe I’ll make the switch in the future.
Bead Factory is also know as Boheiman Crystal in Downtown LA. If you a local the prices in store are cheaper and you don’t have to buy in bulk. I used to buy a lot. Hundreds of thousands of stones. Ballroom costumes cover a lot more fabric.
Application tip. Put the glue in a little squeeze bottle with a metal tip. These are usually found in the dying section of Joanns or Michaels. Squeeze little dots where you want the stones to be. With a toothpick with a little ball of beeswax use that to pick up the stones and place them on. Quickest messless method.
Can you tell I’m slowly reading every entry on your blog. Binge reading.
Stunning dress!
Thanks Tatiana!
You did a fabulous job!!!
Thank you!
That is so good! You have inspired me to do this to my dresses! Hmm where’s my glue… 😛
Hi Sarah,
You have done a fabulous job stoning your first dress! Congratulations for taking the plunge! It’s a scary venture when you don’t have a clue what you are doing! Been there and done that! Now….I stone all three of my daughters’ dresses and love doing it!
I will only make one suggestion….use REAL SWAROVSKI CRYSTALS as there is a major difference!!!! I purchase mine from Tami’s Place located in Tallahassee, Florida. You don’t have to be a business to purchase Wholesale Full Packs! Great deals are had when you purchase this way! You’ll save lots!!!
Tami’s Place has an online website located here:
http://www.tamisplace.com/
Here’s wishing you future years of fun stoning! I always cringe when someone buys a dress from Sharene or wherever and they get them completely stoned by them. It costs a fortune! You know the secret….DO IT YOURSELF!
All the best with your skating!
Susan
Fairy Glen, Saskatchewan
Susan, funny you mention Sharene … that’s where my daughter’s dress is coming from and it was expensive enough to get the dress … i just can’t afford them doing the crystals so i am going to do it myself … Sarah’s post and all other comments are so helpful! … and i think i’ll definitely get the Swarovski Cystals 🙂
Hi Sarah WOW the finished product looks beautiful! As an adult skater I often find it difficult to find the balance between showy and OTT. The little ones can pull anything off! And the top level skaters invest ‘000’s….
How many crystals did you use?
What I do- and it may or may not work for you- is use a home-made ‘pen’ to pick up crystals instead of tweezers. It’s much less time consuming, less fiddly and you don’t have to clean between crystals. I used a paintbrush and a block of wax that I warmed between my hands and then moulded around the ‘wrong’ end of the paintbrush. Then each time I use it I warm it a little again until it’s tacky. It’s sticky enough to pick up the crystals, but not super-strong so it’s easy to set them in place. You can buy store bought versions like this: http://www.lovetocrystal.com/item/rhinestone-tools-adhesives-rhi/jewelers-wax-pick-for-rhinesto/lid=12677760 -but I find my DIY one just as good 🙂
And I second the recommendation for Preciosa- I get compliments all the time no-ones ever noticed they’re not Swarovski but they’re WAY cheaper.
Sarah, you did a beautiful job! Thank you for posting! My daughter’s dress is coming and I just couldn’t afford having them add the crystals so I think I’m going to try it myself. I’m a mom. I’ve cut and pasted lots of times, right?? 😉 Wish me luck!! 🙂
Pingback: Two years of figure skating | Sarah on Ice
I was wondering where you bought your dress!? Please let me know 🙂
Hi Stephanie, if you are looking for unique figure skating dresses please check my work at http://www.ZhannaKens.com. I hope I can be a help to you. 🙂 Thank you.
I agree, your final dress looks great! I’m in the process of stoning a new dress for my daughter (she’s been skating 10 years, so I’ve glued a lot of crystals!) and am searching the web for laying out crystals all over the dress in a type of grid pattern (I’ve always just outlined certain parts, or done lines/designs. I’m thinking there must be a pattern or technique out there somewhere… but I also appreciated reading that you eyeballed your scattered stones on the bodice, I may end up doing it that way if I can’t find a pattern.
One tip for an applicator that I picked up from a crystalling dad at our rink– try a birthday candle for picking up the stones (especially 16ss and 20ss sizes). I do about 6-10 dots of glue on the dress at a time, then pick each stone up with the candle and place it, then go back and press them down lightly with the flat end of a shish kebab skewer.
I’m so happy I stumbled across this post. I just started to figure skating 1 year ago and as an adult skater it’s sometimes hard to find dresses. I found a plain black one and I’m starting to stone it now. It’s been tedious and I too started with the edges, but now have to take the leap to the bodice. You’re dress came out amazing!
Who is the model on the front page. Is that your beading handiwork on it?
Love it! I’m just starting to work on stoning my own costumes for aerial hoop, this is very helpful to read. Where did you buy that dance dress?
I stumbled upon your post while searching for Swarovski crystals online and I am so glad I did! I am an adult figure skater, getting ready to compete for the first time and I am considering stoning my own costume (a catsuit, not a dress :)) – your post has been very helpful! Also, your dress turned out gorgeous!
Thanks for a great how-to article! I used your technique to stone my first adult dress. I skated back when sequins and rocaille beads were the norm and this is so much easier and more sparkly, which is always fun. The only things I did differently were using really skinny needle nose pliers and baby wipes. I reused the wipes until they dried out, so I didn’t go through too many. Thanks, again!
Teresa
thank you for all your comments and tips. My 14yr old triplets have been skating for 9yrs . i have bought a few non- embellished dresses and in the last few years made dresses myself. I’ve tried stoning with the hot fix tool and the hot back crystals. Another skating Mom that stones quite a lot told me that a couple of years ago Swarovski had some bad batches of glue and they seemed to be right because after stoning a dress and going to a competition the gems fell off. I tried the 6000 glue and it was messy and i got gun shy from it. I ruined a crepe and net dress with glue and the gems didn’t seem to want to stay stuck to the netting. I’ve recently turned to lace, pearls and sew on sequins, which is very time consuming and now that the girls are older they want some “bling” so this blog has been very helpful. With your suggestions i will definitely try the glue method again! thank you so much. Trish
I loved your write up. Like you were, I’m not creative nor crafty. I have twin daughters who just started skating and the costs associated just floor me. So…. Can you share where you bought the rhinestones? Is love to give it a try!
I really love the dress that you made!! I would love to make one just like it! Where did you get the dress without the crystals? Online or at a store? and from what website or store? Beautiful work!!
Beautiful!! I love it!! Where did you get it?
Wauw! Your dress is absolutely amazing! this is the one were I have been looking for for months! I hoop ik can find the pail one soon! I can only find him in the pink edition but I love the red/ black version! I’m sorry for my english! I’m from Holland haha! Your dress is stunning! I’m very jalous haha! beautiful!
Whoops, I didn’t realize this post was still getting comments! To answer the question of where the dress is from, it’s a Brad Griffies dress and I ordered it online. I believe it was around $180 without crystals (it would have been almost $600 with them, which is why I decided to do it myself!).
Hello Sarah! Your how-to guide is awesome – I used it to stone two ballroom dance dresses because like you said, the cost is insane. I plan on writing a blog post of my own about it – I’d love to reference your guide in my post. Would that be okay? 🙂
Pingback: Gettin’ Crafty: How to Add Rhinestones to a Dress | But Why?
More thanks! I’m starting competitive ballroom dancing (on a budget) and have a “pre-owned” dress that they suggested I stone. I have NO idea what this all is, just like you, but my daughter’s got some background in beading so she’s going to help me. I found this last night as I was searching and we now have our Swarovskis with some cheap ones, Gemtech glue and some E300 (she can use that) and we’re ready to start! We never could have even started without this blog. BTW, I took up dancing at a much later age than you. Props to the old broads!
Absolutely Stunning! Love!!!!
Take a look at this new dress we just got in! It’s the perfect blend of edge and class! Hope you guys like it! https://www.timelessgala.com/shop/clothing/dresses/product/249-vanessa
Jenna Vance – TimelessGala.com
Pingback: Stoning my own figure skating dress, Part 2 | Sarah on Ice
really great work. i just thought of stoning my own dress and was wondering how, and i found this. thanks a lot.
This website is how I learned how to stone a costume for a ballroom dancing showcase. It was really helpful. If you wish, I can post another link to a different blog from another woman who had good details also.
Pingback: Make Money Stoning Dresses | Technologysinfo
Great! 🙂 I’m planning to redesign some of my dance dresses too. 🙂
It looks awesome! We are just getting into competitions and I’ll be honest, I’m not interested in paying a huge amount for the dress. I’ve been able to buy a few on eBay that are just fine for my daughters level of skating, But they could use a little bling. Your “how to” was the first one that actually made any sense to me, and so I tried it on one of her T-shirts, and it was really cute! I think I could do this on a dress! Thank you so much.
I wonder if she had any idea how many people she would help with her piece? I used her advice last year to stone a dress for a ballroom competition. I never wou have tried it if I hadn’t read this.
Sarah, I didn’t realize my last name would appear. Can you delete it?
hello, where did you order this dress from? 🙂
Love this tutorial!
I always used to use Preciosa and Swarovski because I don’t like how the cheaper acrylic stones don’t sparkle much.
Last year I started using stones from Eleure (I buy them from http://www.eleure.com) as they are way cheaper and look (in my opinion) pretty much the same from far away.
Beautiful!! Thanks for taking the time to write all this!
Thanks for sharing beautiful and impressive blog. I love you Blog Keep Sharing
How long does the dress take to dry afterwords.
I use Gem-Tac on my ballroom dance dresses. They tell you to wait 24 hours before moving the item. So I set up on my dining room table, stuff some pillows into the dress so the fabric is taught and tell people to stay away from it. Gem-Tac actually holds it in place and dries to some degree within a few seconds, but it’s not truly secure.